Зображення 1

BankSim: A Learning Project and Testbed for New Technologies

BankSim is an educational project created to develop skills in the modern enterprise technology stack. Its purpose is not only to build expertise but also to serve as a testbed for experimenting with new technologies, such as new versions of Spring and other frameworks, in the future. The project is designed to push my understanding of current industry practices while allowing flexibility in the learning process. It provides a valuable opportunity to practice using various tools and learn from mistakes, which are essential for growth. Additionally, it helps me improve my problem-solving abilities and technical skills in an environment that closely simulates enterprise-level challenges.

For building this application, I chose a microservices architecture because it provides the opportunity to gain experience with a wide range of tools and components that are relevant for modern development. This architecture also allows better separation of responsibilities and ensures greater reliability of the system. Moreover, it offers flexibility for future upgrades or technology integrations. It also ensures scalability, which is an essential factor for any distributed system.

In the initial phase of development, I decided not to stick to a specific architectural pattern, such as Event-Driven or Domain-Driven Design, as it could limit the tools I could use and require additional time to implement. Instead, I focused on quickly achieving results and experimenting with different approaches to find the most effective solutions for the given challenges. The first release of the project includes aspects of different architectural patterns and various methods of interaction between microservices, allowing me to explore and refine different solutions.

Technology Stack for the First Release

Spring Boot (Data JPA, Web, WebFlux, Security, Validation): the foundation for building microservices.
Springdoc OpenApi-UI: for documenting REST APIs.
Spring Kafka: for message exchange between services, enabling asynchronous communication and supporting large data volumes.
Spring Cloud (Gateway, Config, Eureka Discovery, OpenFeign): for microservice integration, request routing, and centralized configuration.
Flyway: for database migration management.
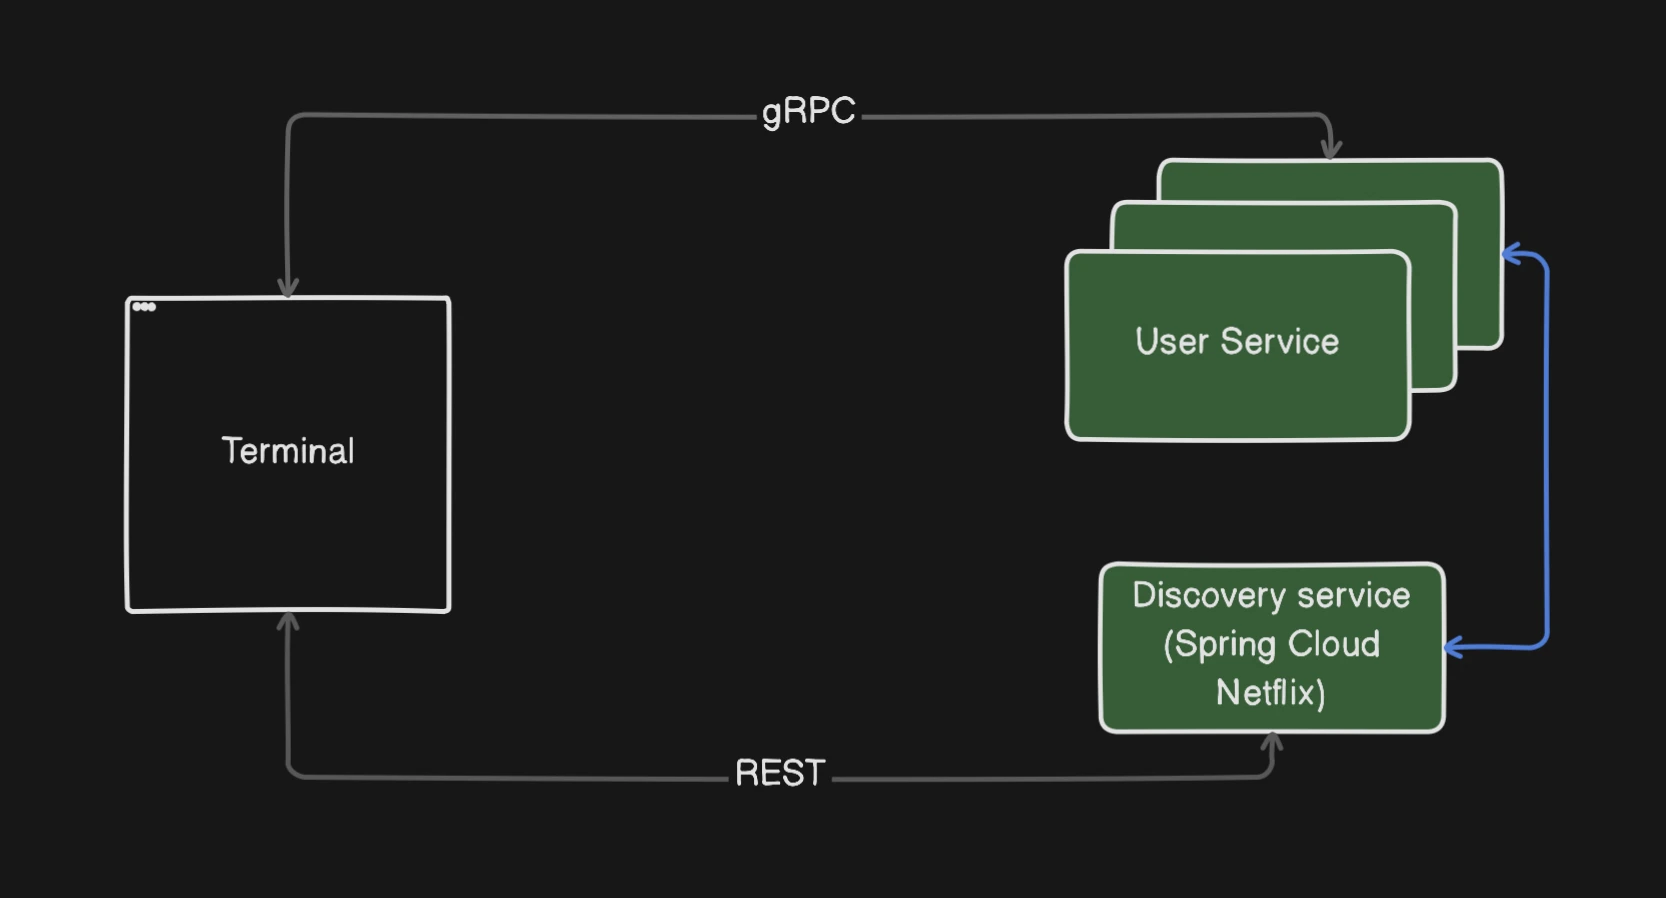
gRPC (com.google): for high-performance microservice communication, reducing latency compared to traditional REST APIs.
PostgreSQL: relational database for structured data storage.
MongoDB: document-oriented database for unstructured data storage.

BankSim is a project that not only enhances my technical skills but also allows me to experiment with new tools and approaches. Testing new solutions in this project will help me stay current with industry trends and apply these skills to deliver value in a real-world enterprise environment.
Read more

Planning the High-Level Architecture of BankSim

October 15, 2024

Зображення 2

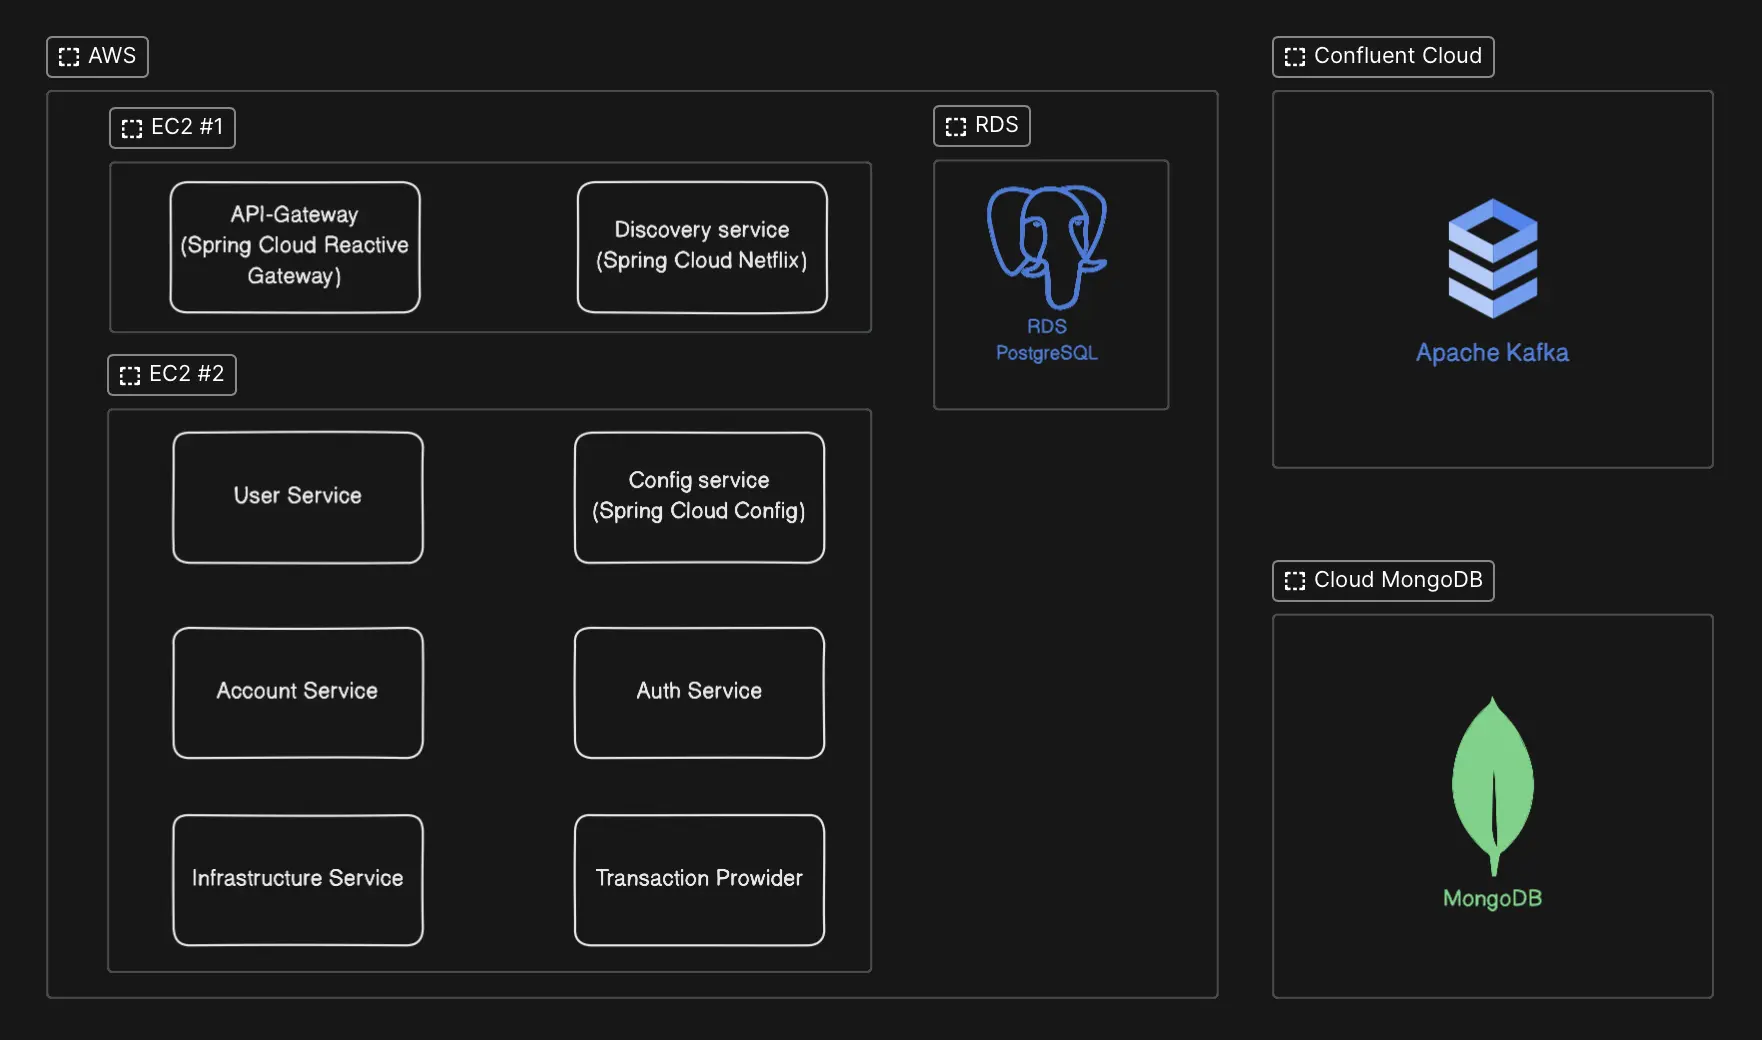
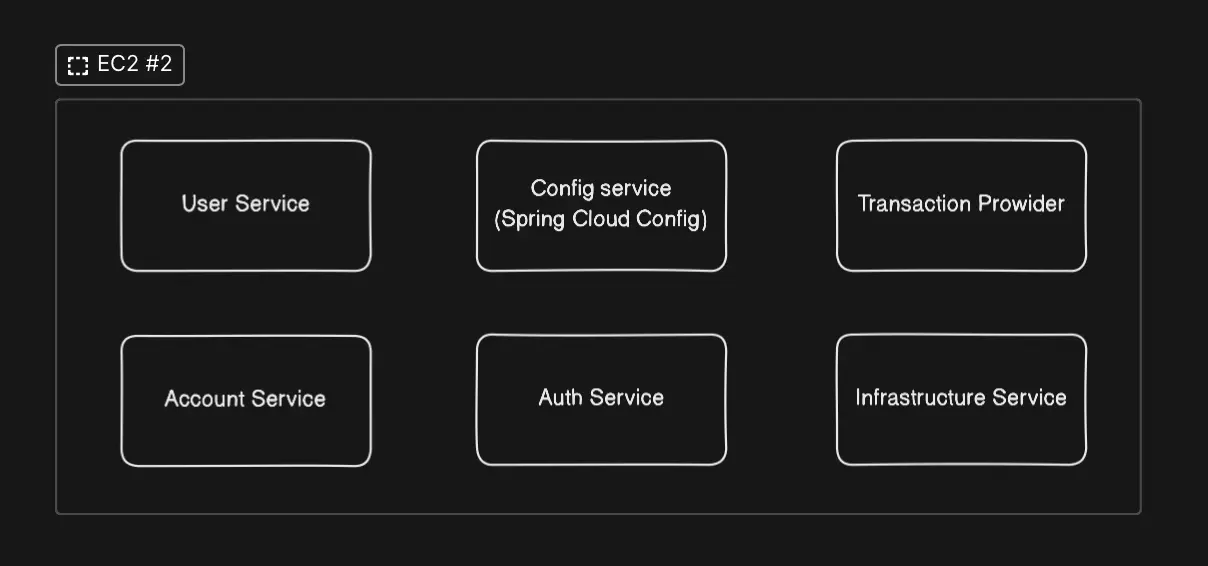
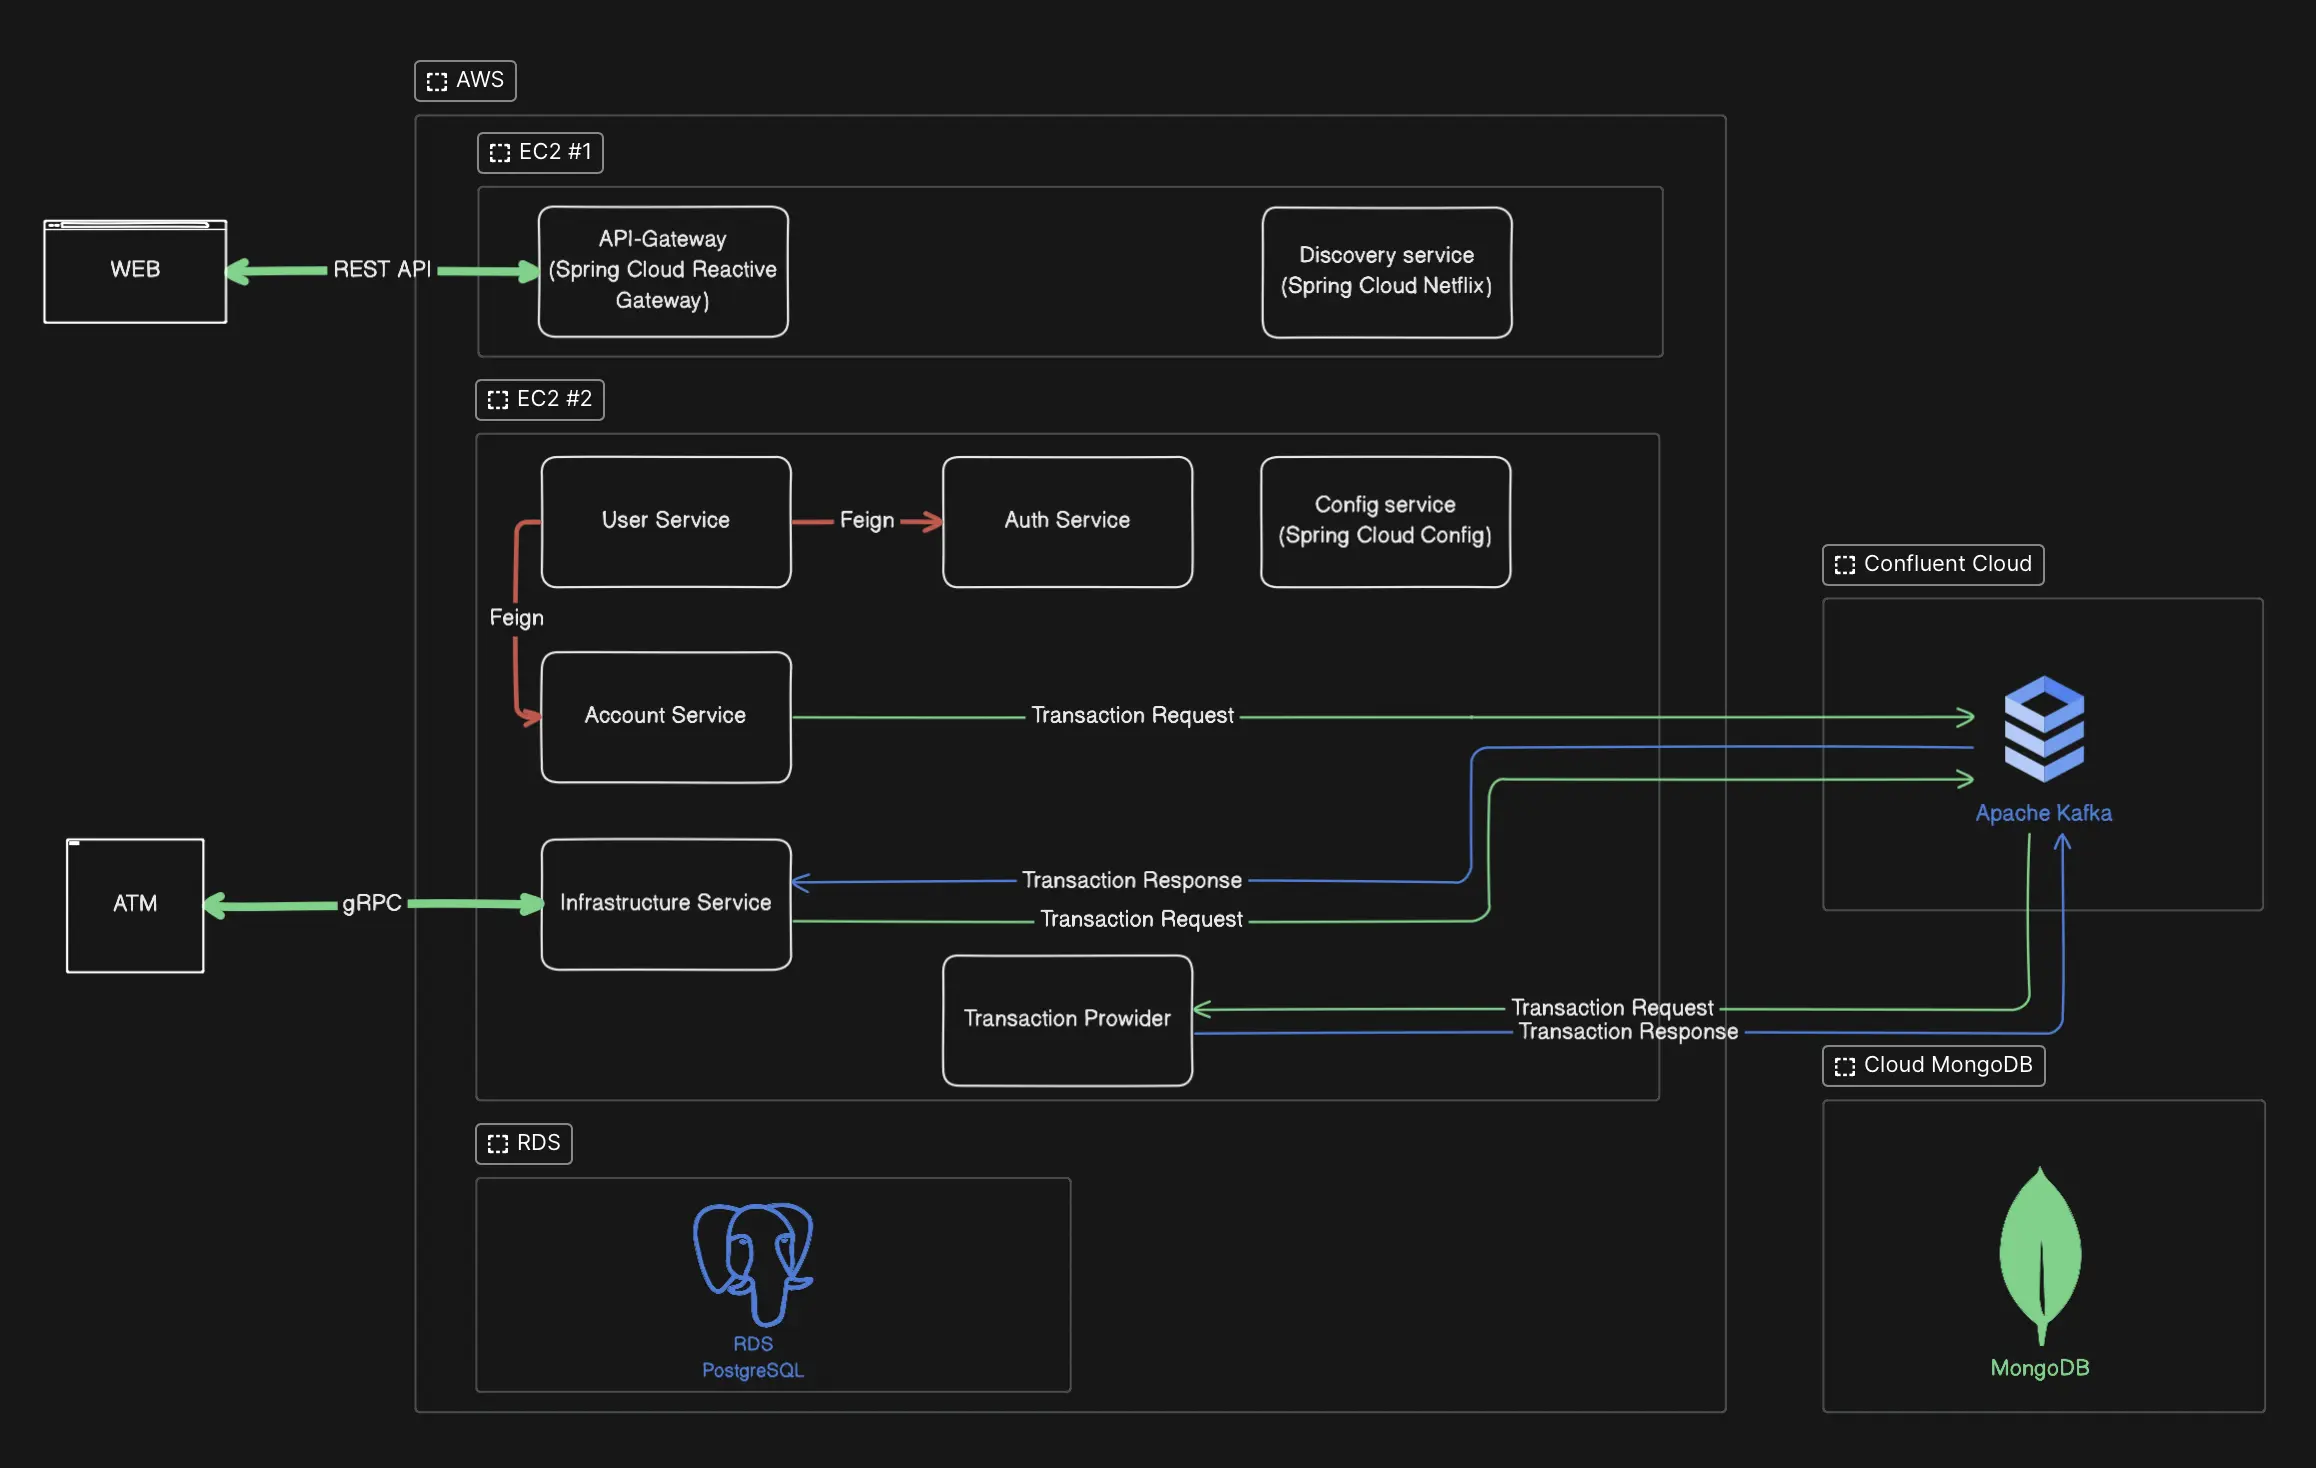
When planning the high-level architecture of BankSim, I took into account the expected load, which implies the need for scalability, as well as the logical separation of responsibilities among microservices. The resulting architecture for the first release includes the following services:

Infrastructure Service: Handles ATM operations and, in the future, will also manage bank tellers.
Account Service: Manages user accounts and their transactions.
Transaction Provider: Executes transactions between accounts and performs currency conversions. In the future, I plan to split this service into two separate microservices: Transaction Manager, which will handle currency conversions and commission calculations, and Transaction Provider, which will only execute transactions. For security reasons, Transaction Provider will not have any other endpoints or connections besides those with Transaction Manager.
User Service: Handles user data.
Auth Service: Manages user authentication, issuance, and renewal of JWT tokens.
Gateway: Routes requests between the different services.
Config Service: Provides centralized configuration management.
Discovery Service: Registers microservices within the system.

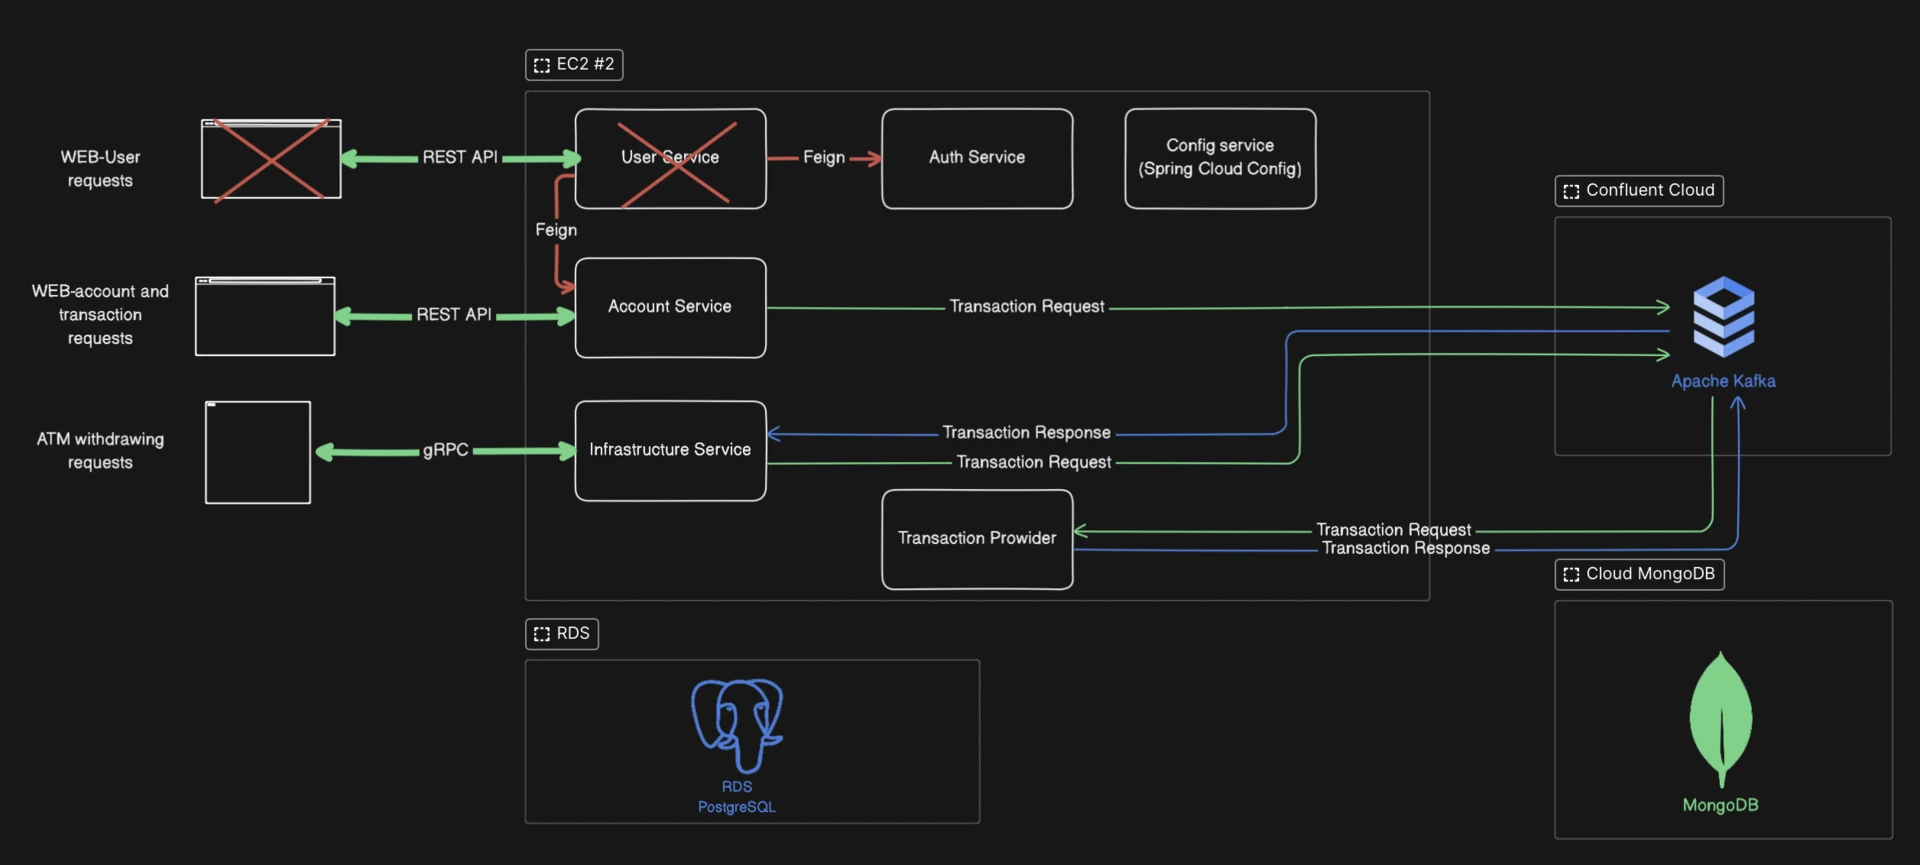
This configuration allows for optimal load distribution and high fault tolerance in case any microservice fails. The image below illustrates how the system can operate with limited functionality in such situations.

This high-level architecture reflects a practical balance between initial simplicity and future extensibility, allowing me to focus on core functionality now while keeping room for future growth and experimentation.

Зображення 2

By designing the system with scalability and logical separation in mind, I aimed to ensure that each microservice has a clear set of responsibilities, making the system easier to maintain and evolve over time. The modular approach also provides the flexibility to enhance or replace components as new requirements emerge. Additionally, the use of separate services for different responsibilities, such as user authentication and transaction management, helps to improve security and scalability, ensuring that critical functions remain isolated and protected from potential vulnerabilities in other parts of the system.

Read more

Optimizing BankSim Deployment on AWS

October 16, 2023

Зображення 2

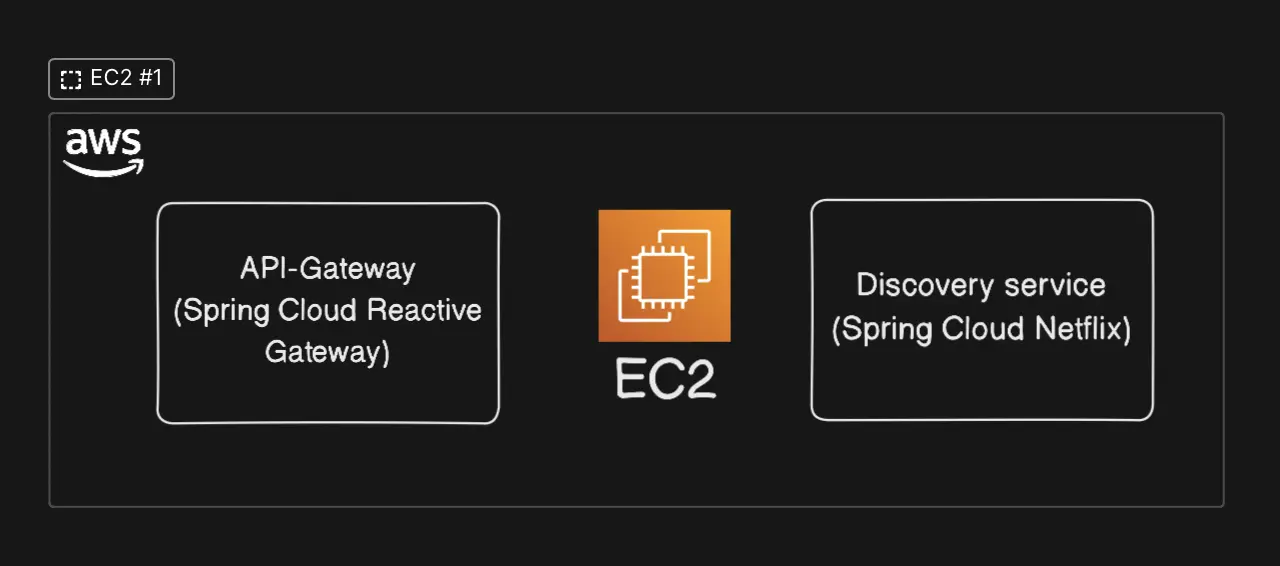
When developing the BankSim project, I initially knew that I would be deploying it on AWS, using at least one free-tier EC2 instance with a static IP address. The free-tier EC2 options on AWS are t2.micro and t3.micro, which come with only 1 CPU and 1 GB of RAM. Herein lay the challenge: I needed three microservices with static addresses for Gateway, Config Server, and Discovery Server. Each microservice requires between 300 MB and 450 MB of RAM, meaning I needed at least 1350 MB of RAM to ensure smooth operation. However, the t2.micro and t3.micro instances only offer 1 GB of RAM, which is insufficient.

The solution to this problem was found in the Spring documentation. Typically, for registering microservices in a distributed Spring Cloud network, you need the address of both the Config Server and the Discovery Server, which is the most common configuration. However, I discovered a solution that allowed me to use only the address of the Discovery Server.

In the final implementation, my microservices register as follows:

Step 1 Upon startup, the microservice queries the Discovery Server and retrieves the address of the registered Config Server.
Step 2 The microservice then sends a request to the Config Server to obtain all the required configuration properties.
Step 3 Finally, it registers itself with the Discovery Server and continues sending heartbeats to indicate that it is active in the network.

This optimization allowed me to reduce resource consumption and successfully run all necessary microservices on a single instance with limited memory. The animation above shows the full startup cycle of the system and how a user request is handled through the Gateway.

Read more

Setting Up BankSim's Core Services: Discovery Server and Gateway

October 16, 2024

Зображення 4

The deployment of a microservice project requires careful preparation of infrastructure, including core services like Discovery Server and Gateway. In this post, I'll share my experience of deploying these core components of BankSim on AWS.

Deploying Discovery Server on AWS

The Discovery Server plays a crucial role in the architecture of BankSim, as it registers all the microservices and keeps track of their availability in the system. To start, I configured the environment, created a Docker image, and deployed the Discovery Server on a t3.micro instance using the following script:


#!/bin/bash

DISCOVERY_PASSWORD=password
DISCOVERY_USERNAME=username
EUREKA_SERVER_PORT=8001
EUREKA_HOSTNAME="localhost"

IMAGE_NAME="discovery_serv"

docker run -d -p ${EUREKA_SERVER_PORT}:${EUREKA_SERVER_PORT} \
  -e DISCOVERY_PASSWORD=${DISCOVERY_PASSWORD} \
  -e DISCOVERY_USERNAME=${DISCOVERY_USERNAME} \
  -e SERVER_PORT=${EUREKA_SERVER_PORT} \
  -e EUREKA_HOSTNAME=${EUREKA_HOSTNAME} \
  ${IMAGE_NAME}

Here, EUREKA_HOSTNAME and EUREKA_SERVER_PORT represent the address and port of the Discovery Server instance. Since I planned to deploy only one instance, the values were set to localhost and 8001, meaning the Discovery Server would register itself. I also configured a username and password for future microservices to register securely.

Deploying Gateway on AWS

The Gateway is responsible for routing requests to different microservices within the system. I deployed the Gateway using another t3.micro instance with the following script:


#!/bin/bash

CONFIG_SERVER_PASSWORD=password
CONFIG_SERVER_USERNAME=username
GATEWAY_SERVER_PORT=8003
EUREKA_URL="http://discovery-username:discovery-password@discovery-host:8001/eureka/"

IMAGE_NAME="api_gateway"

EXTERNAL_IP=$(hostname -I | awk '{print $1}')

docker run -d -p ${GATEWAY_SERVER_PORT}:${GATEWAY_SERVER_PORT} \
  -e CONFIG_SERVER_PASSWORD=${CONFIG_SERVER_PASSWORD} \
  -e CONFIG_SERVER_USERNAME=${CONFIG_SERVER_USERNAME} \
  -e SERVER_PORT=${GATEWAY_SERVER_PORT} \
  -e EUREKA_URL=${EUREKA_URL} \
  -e EXTERNAL_IP=${EXTERNAL_IP} \
  ${IMAGE_NAME}

The EXTERNAL_IP variable is crucial for registering the server's external address with the Discovery Server. On most Linux distributions, you can obtain the IP using the command $(hostname -I | awk '{print $1}'). However, since I deployed the project on AWS, I used a different command to retrieve the instance's public IP address:


$(curl -H "X-aws-ec2-metadata-token: $(curl -X PUT "http://169.254.169.254/latest/api/token" -H "X-aws-ec2-metadata-token-ttl-seconds: 21600")" http://169.254.169.254/latest/meta-data/public-ipv4)

The EUREKA_URL contains the Discovery Server's address along with the login credentials needed for registration.

Summary

Deploying Discovery Server and Gateway was a foundational step in creating the BankSim infrastructure. By setting up these core components first, I could ensure that future microservices could seamlessly register themselves and interact through the Gateway, making the architecture scalable and well-organized.

Зображення 4
Read more

Setting Up BankSim's Core Services: Deploying Config Server and Other Microservices

October 19, 2024

Зображення 5

After setting up the core services like the Discovery Server and Gateway, the next step was to deploy the Config Server and the rest of the microservices. Here’s how I navigated the challenges and completed the deployment process for BankSim.

Deploying Config Server on AWS and Raspberry Pi

The Config Server is essential for providing centralized configuration to all microservices. My initial plan was to deploy part of the project on a Raspberry Pi 5 to save costs. However, I faced issues when using public Wi-Fi without access to the router—specifically, the router's firewall blocked access to my microservices. To solve this, I rented an additional EC2 instance and proceeded with the deployment.

The script to run the Config Server container looks like this:


#!/bin/bash

ACTIVE_PROFILE="native"
CONFIG_SERVER_PASSWORD="my-password"
CONFIG_SERVER_USERNAME="my-username"
GIT_PASSWORD="my-git-password"
GIT_URI="https://my-git-repo-url"
GIT_USERNAME="my-git-username"
CONFIG_SERV_SERVER_PORT=8002
EUREKA_URL="http://my-username:my-password@localhost:8001/eureka/"

IMAGE_NAME="config_serv"

EXTERNAL_IP=$(hostname -I | awk '{print $1}')

docker run -d -p ${CONFIG_SERV_SERVER_PORT}:${CONFIG_SERV_SERVER_PORT} \
  -e ACTIVE_PROFILE=${ACTIVE_PROFILE} \
  -e CONFIG_SERVER_PASSWORD=${CONFIG_SERVER_PASSWORD} \
  -e CONFIG_SERVER_USERNAME=${CONFIG_SERVER_USERNAME} \
  -e GIT_PASSWORD=${GIT_PASSWORD} \
  -e GIT_URI=${GIT_URI} \
  -e GIT_USERNAME=${GIT_USERNAME} \
  -e EUREKA_URL=${EUREKA_URL} \
  -e SERVER_PORT=${CONFIG_SERV_SERVER_PORT} \
  -e EXTERNAL_IP=${EXTERNAL_IP} \
  ${IMAGE_NAME}

Here, the ACTIVE_PROFILE="native" value means the application will load configuration files locally from the /config/ directory. Alternatively, setting "git" would make the application look for configurations in the Git repository specified by GIT_URI.

Deploying Other Service Microservices

Once the Config Server was up and running, I moved on to deploying other service microservices. These microservices use similar deployment scripts, and here's an example:


#!/bin/bash

CONFIG_SERVER_PASSWORD="my-password"
CONFIG_SERVER_USERNAME="my-username"
TRANSACTION_SERV_REST_SERVER_PORT=8006
EUREKA_URL="my-eureka-url"
ACTIVE_PROFILE="prod"

IMAGE_NAME="transaction_serv"

EXTERNAL_IP=$(hostname -I | awk '{print $1}')

docker run -d -p ${TRANSACTION_SERV_REST_SERVER_PORT}:${TRANSACTION_SERV_REST_SERVER_PORT} \
  -e CONFIG_SERVER_PASSWORD=${CONFIG_SERVER_PASSWORD} \
  -e CONFIG_SERVER_USERNAME=${CONFIG_SERVER_USERNAME} \
  -e REST_SERVER_PORT=${TRANSACTION_SERV_REST_SERVER_PORT} \
  -e EUREKA_URL=${EUREKA_URL} \
  -e ACTIVE_PROFILE=${ACTIVE_PROFILE} \
  -e EXTERNAL_IP=${EXTERNAL_IP} \
  ${IMAGE_NAME}

This script allows the service microservice to connect to the Config Server and register itself with the Discovery Server.

Lessons Learned and Next Steps

Deploying the Config Server and other microservices on both AWS and Raspberry Pi presented challenges with networking and resources. However, leveraging both AWS and a cost-effective Raspberry Pi allowed me to create a distributed infrastructure that balances cost and functionality. By configuring the Discovery Server, Gateway, and Config Server, I ensured a centralized, scalable approach for managing all microservices effectively.

This deployment marks a key milestone in making BankSim a fully operational distributed system, capable of scaling and adapting to future requirements.

Read more